Introduction
I recently spent some time creating rounded text for my GraphicsGen site. I could not find so many great examples around, so I decided to create my own from scratch. In this blog, I will show how to create a function that returns a square canvas, with text following a circle centered in the middle of the square.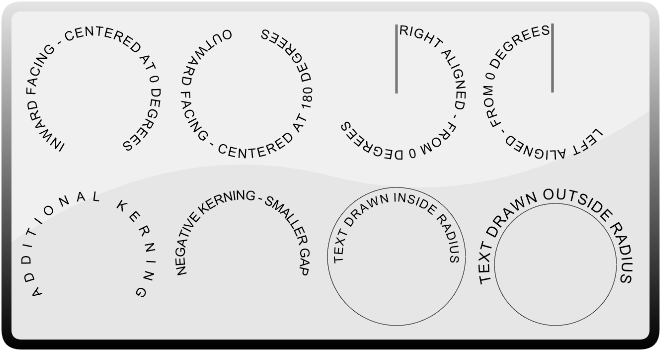
Strategy
So, to create rounded text, we need to think about a number of things:- Type and size of font
- Radius/Diameter
- If the text will sit inside or outside the diameter
- If the text is facing inward or outward
- Alignment of the text - centered, or to the left or right side of a specified angle
- Kerning - to be able to increase or decrease the gap between characters
function getCircularText(text, diameter, startAngle, align, textInside, inwardFacing, fName, fSize, kerning) {
    // declare and intialize canvas, reference, and useful variables
    align = align.toLowerCase();
    var mainCanvas = document.createElement('canvas');
    var ctxRef = mainCanvas.getContext('2d');
    var clockwise = align == "right" ? 1 : -1; // draw clockwise for aligned right. Else Anticlockwise
    startAngle = startAngle * (Math.PI / 180); // convert to radians
The function arguments are as follows:text - The text that will be displayed in the circle.
diameter - The diameter of the imaginary circle the text will be placed inside or outside.
startAngle - The angle where the text will be aligned against. 0 is the very top of the circle.
Typically, 0 works best for inward facing text, and 180 works best for outward facing.
align - Align to the left, right, or at the center of the startAngle
textInside - if true, text will be drawn inside the diameter. Otherwise, the canvas diameter will be extended by the height of the text * 2
inwardFacing - if true, the base of the text will be closest to the center of the circle. If false, the base will face away from the center of the circle.
fName and fSize - Specify the font name and font size.
kerning - To increase or decrease the gap between characters. 0 is normal distance
The clockwise variable is set as 1 for clockwise and -1 for anticlockwise. This is really useful later on when rotating. We can simply multiply the rotation amount by "clockwise" and the direction will be taken care of.
Now lets calculate the height of the text. There are many ways to do this, but here I'm simply adding a div to the DOM, setting the font name and height, then measuring the offsetHeight.
 // calculate height of the font. Many ways to do this - you can replace with your own!
    var div = document.createElement("div");
    div.innerHTML = text;
    div.style.position = 'absolute';
    div.style.top = '-10000px';
    div.style.left = '-10000px';
    div.style.fontFamily = fName;
    div.style.fontSize = fSize;
    document.body.appendChild(div);
    var textHeight = div.offsetHeight;
    document.body.removeChild(div);
For cases where the function caller specifies drawing outside, we expand the diameter
     if (!textInside)
        diameter += textHeight;
Here we will do some more basic setup
    mainCanvas.width = diameter;
    mainCanvas.height = diameter;
    // omit next line for transparent background
    mainCanvas.style.backgroundColor = 'lightgray';
    ctxRef.fillStyle = 'black';
    ctxRef.font = fSize + ' ' + fName;
Now we are getting into the meat of the function! For some cases, we are going to reverse the order of the letters. This simplifies the looping code when we finally get there later on. We will reverse the order for the following cases
- Text aligned left, and facing inwards
- Text aligned right and facing outwards
- Text centered and facing inwards
    if (((["left", "center"].indexOf(align) > -1) && inwardFacing) ||
    (align == "right" && !inwardFacing)) text = text.split("").reverse().join("");
No, the reverser is not state of the art, and does not handle certain characters, but you welcome to change it for something more effective!The following code block will do some startAngle setup and positioning
 // Setup letters and positioning
    ctxRef.translate(diameter/2, diameter/2);          // Move to center
    startAngle += (Math.PI * !inwardFacing);       // Rotate 180 if outward facing
    ctxRef.textBaseline = 'middle';                // Ensure we draw in exact center
    ctxRef.textAlign='center';                     // Ensure we draw in exact center
startAngle is adjusted by 180 degrees for text that is outward facing. It is drawn at the bottom of the context (and the circle) so it faces outwards. Of course text that is drawn at the top faces inwards. For perfect circular text, I find it easiest to position each character in the center of the location we are drawing at. This allows for clean angle setting and related left or right alignment.
Here, if the text is centered, we will rotate backward or forward depending on if inward or outward facing.
    // rotate 50% of total angle for center alignment
    if (align == "center") {
        for (var j = 0; j < text.length; j++) {
            var charWid = ctxRef.measureText(text[j]).width;
            startAngle += ((charWid + (j == text.length-1 ? 0 : kerning)) /
            (diameter / 2 - textHeight)) / 2 * -clockwise;
        }
    }
No we can simply move to the start angle, and draw each of the letters.To get correct distances, I rotate half the distance of the character, draw it, then rotate half more. There are also other ways to do this, but with this method, we manage the start and end points nicely for when using alignment.
    // Phew... now rotate into final start position
    ctxRef.rotate(startAngle);

    // Now for the fun bit: draw, rotate, and repeat
    for (var j = 0; j < text.length; j++) {
        var charWid = ctxRef.measureText(text[j]).width; // half letter
        // rotate half letter
        ctxRef.rotate((charWid/2) / (diameter / 2 - textHeight) * clockwise);
        // draw the character at "top" or "bottom"
        // depending on inward or outward facing
        ctxRef.fillText(text[j], 0, (inwardFacing ? 1 : -1) * (0 - diameter / 2 + textHeight / 2));

        ctxRef.rotate((charWid/2 + kerning) / (diameter / 2 - textHeight) * clockwise); // rotate half letter
    }
Done! Close the function and return the freshly printed canvas.
 // Return it
    return (mainCanvas);
}
The translations and rotations are a bit tricky to get to grips with at first. I read on the net somewhere recently that it helps to visualize a piece of carbon paper over your canvas. That is your context, and each time you translate or rotate, the carbon paper moves around accordingly. Then when you draw anything on the carbon paper, at any specified location (point 0,0 still being top left of the paper) it will appear directly underneath it on the canvas.OK, less chatter, more action: Let's go over to jsfiddle and see a working version.
I hope you found this useful!